
Oaklet Notes can keep your notes in sync across your devices without any third-party service in the middle. There are two ways to do it:
- WebDAV through a NAS or another server you run yourself.
- Local Sync, where one of your own computers acts as the sync server for your other devices on the same Wi-Fi.
Either way, there's no Oaklet account, and Oaklet doesn't run a sync server. Here's how to set up each one, and what to expect once it's running.
What you need
- Oaklet Notes on each device you want to keep in sync. It runs on Windows, Mac, Linux, iPhone, iPad, and Android. Use the latest version on every device.
- Pro. Sync is part of Pro, and you can try Pro free for 30 days in the app. Prices are on our pricing page. If you stop using Pro later, sync stops, and your notes stay on each of your devices, where you can still open and edit them.
- A vault, which is the encrypted library that holds your notes, and its vault password.
- For WebDAV: a NAS, or any server you run yourself, with WebDAV turned on.
- For Local Sync: a computer that's on, with Oaklet running, whenever you want your devices to sync.
Option 1: Sync through your NAS with WebDAV
WebDAV is a standard way of sharing files that many NAS systems have built in.
Step 1: Turn on WebDAV on your NAS
Most NAS systems include a WebDAV server that you switch on in their control panel. On some, you install it from the NAS's app or package center first. Your NAS maker's help pages show where to find it. If someone else set up your NAS for you, send them this step: you need a WebDAV address, a username, and a password.
While you're there, a few things keep your setup safe and simple:
- Create a separate user for Oaklet, and give it read and write access to only one folder for your notes, so it can't see the rest of your files.
- Use the address that starts with https:// if your NAS offers one. It encrypts the connection, so others on the same network can't see your NAS password.
- Write down the WebDAV address, plus the username and password you just created. The address usually looks like
https://<your NAS address>:<port>/<folder>. Use exactly what your NAS shows.
Your NAS password is a different password from your vault password.
Step 2: Connect your first device
- Open Vault Center and go to Sync. On a computer, clicking the cloud icon in the status bar takes you straight there. On a phone, Vault Center is in the More panel.
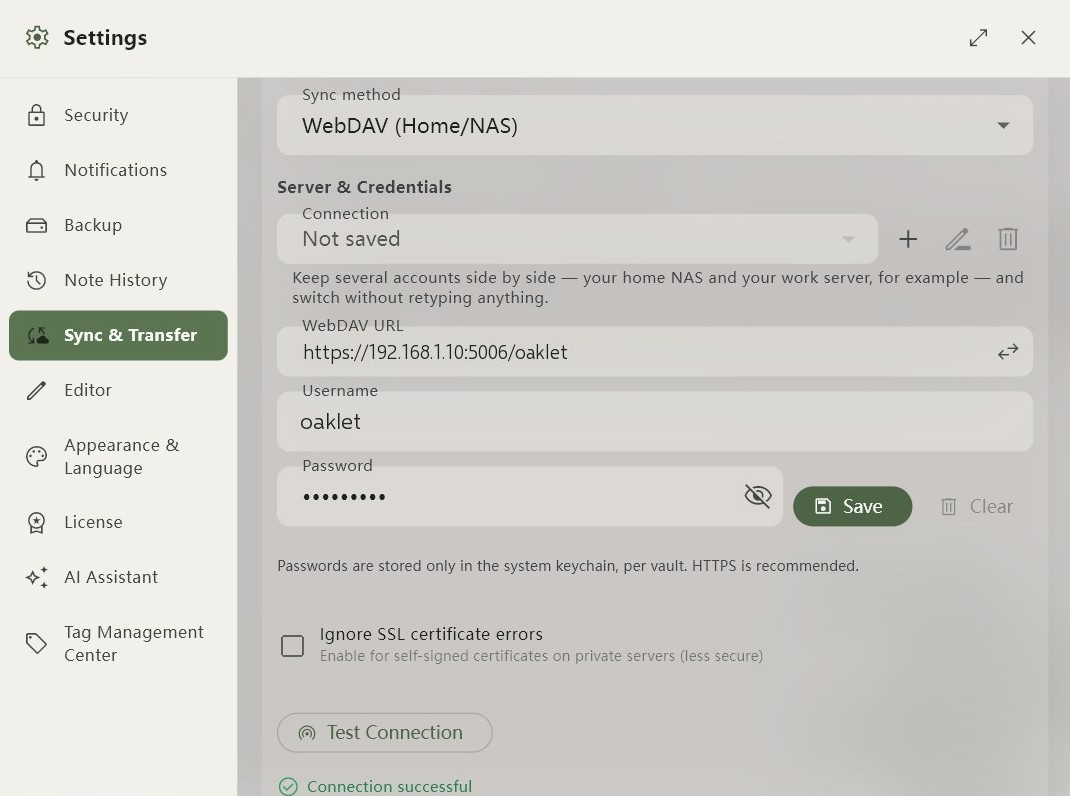
- If sync isn't set up yet, you'll see Set Up Cloud Sync. (In Oaklet, "cloud" includes your own NAS.) Enter your NAS's WebDAV address under URL, then your NAS Username and Password.
- Tap or click Test & Connect.
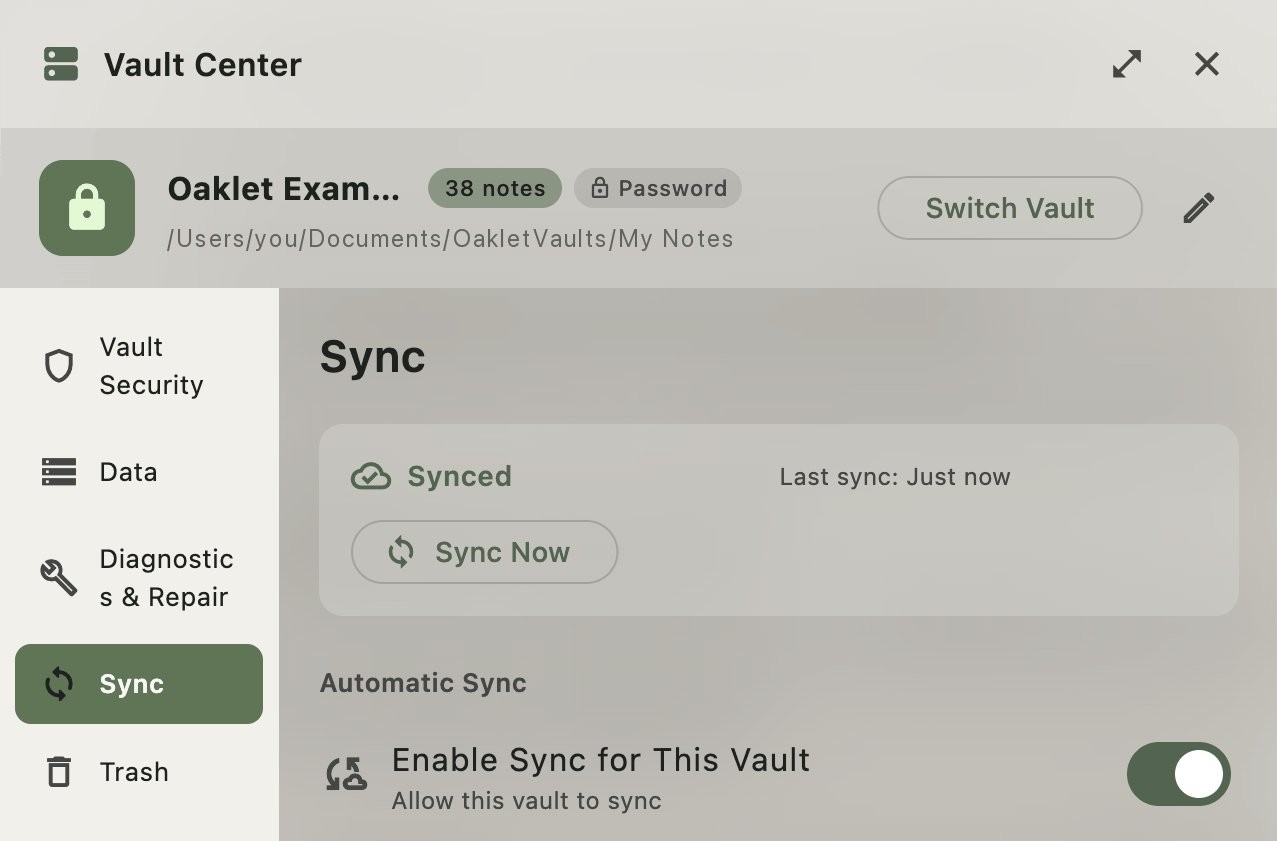
Oaklet checks that it can reach your NAS, saves your NAS password in your device's built-in password storage, and turns on sync for the vault you have open.
If Test & Connect reports a certificate error and the server is your own NAS, it may be using a self-signed certificate. You'll find Ignore SSL certificate errors under Settings → Sync, a separate page from Vault Center that has the same connection fields. It makes the connection less secure, so leave it off unless you need it.
Sync is set up one vault at a time. To sync another vault, open it, go to Vault Center → Sync, and turn on Enable Sync for This Vault.
Step 3: Open the vault on your other devices
On each of your other devices:
- On the screen where you open or create a vault, choose Sync from Cloud. On a new install, choose Open or sync a vault first.
- Enter the same WebDAV address, username, and password.
- Pick your vault from the list and enter its vault password, the one you chose when you created the vault.

A progress panel walks you through each step. If one fails, it tells you why right there. Once the vault opens, the rest of your notes, including images and attachments, keep downloading in the background, so you can start working right away.
Option 2: Use a computer at home with Local Sync
With Local Sync, one computer that's usually on, at home or in a classroom, becomes the sync hub. Your other devices sync with it directly over the same Wi-Fi, so your notes only travel between your own devices.
-
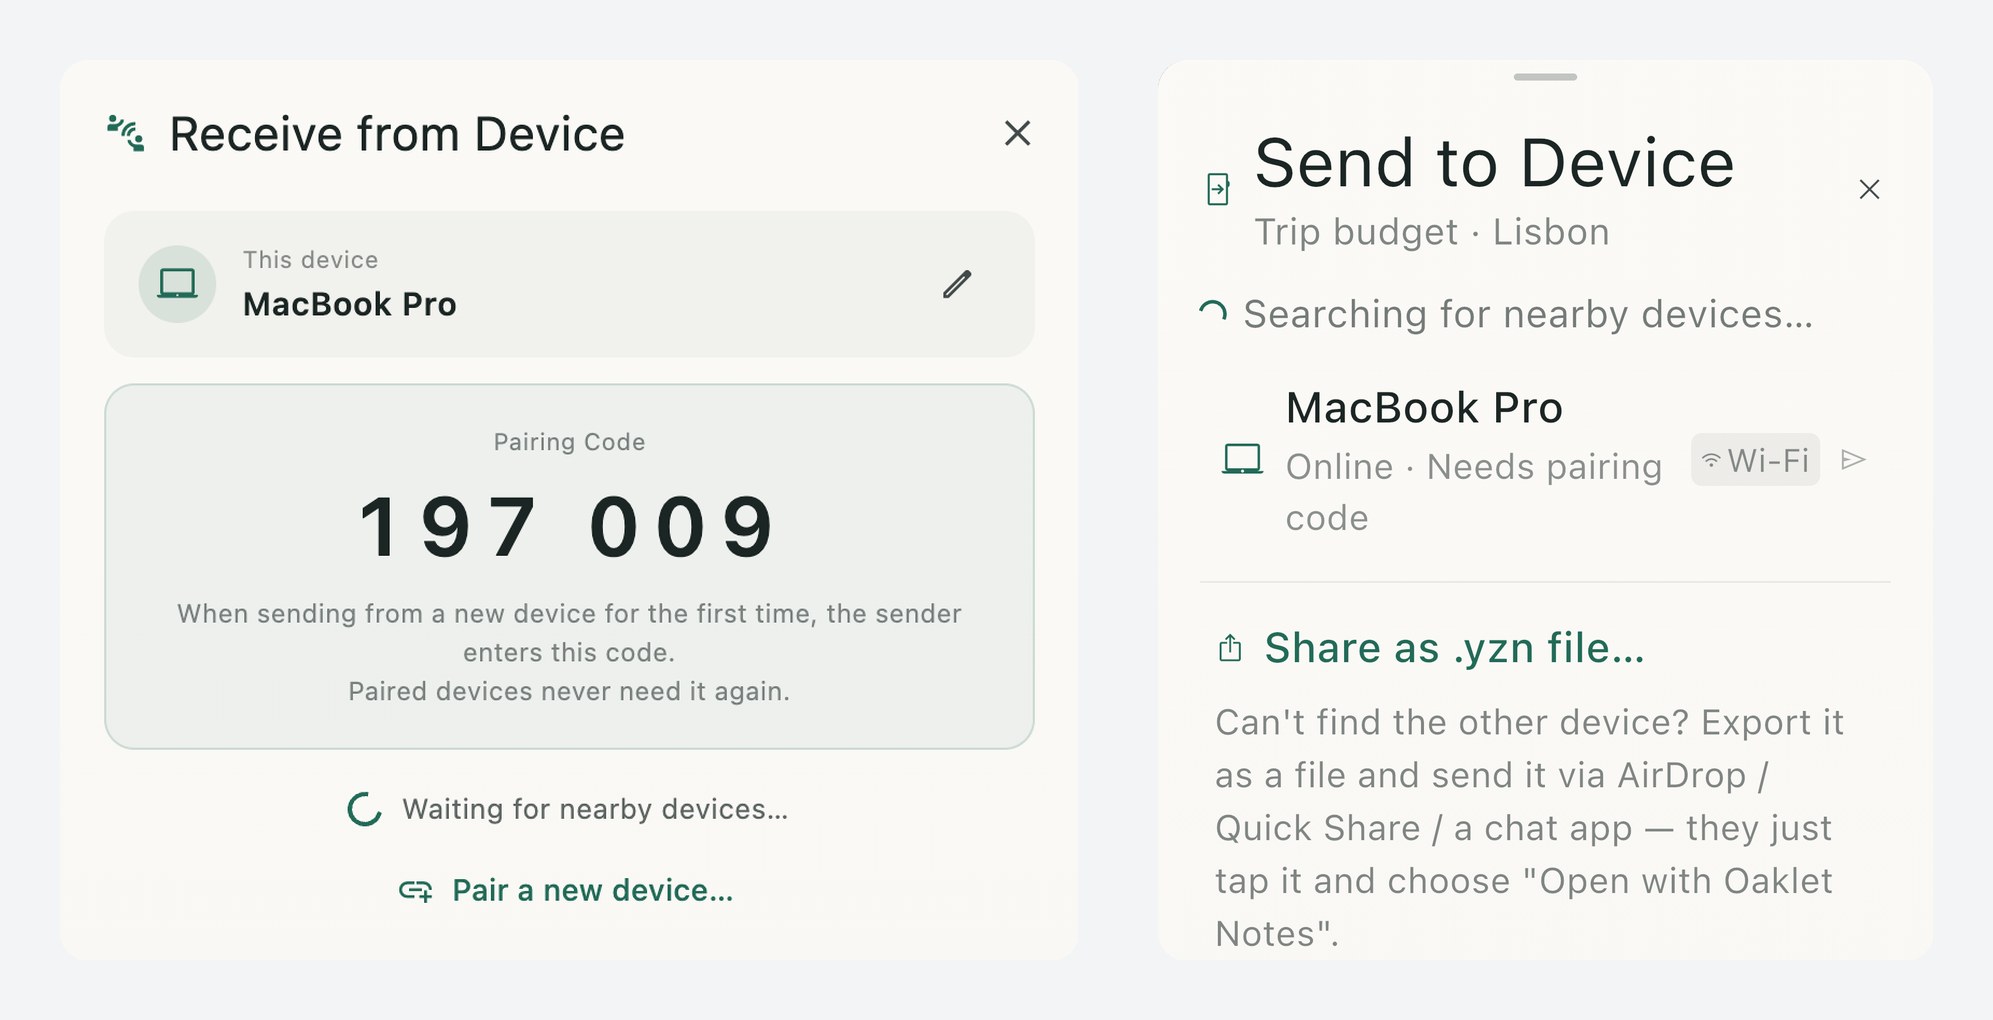
Pair your devices once. On one device, open the Receive from device panel. On the other, tap Pair a new device… at the bottom of that same panel, pick the first device, and enter the 6-digit code it shows. Local Sync and Direct Share use the same pairing, so if you've already paired for Direct Share, you can skip this.
-
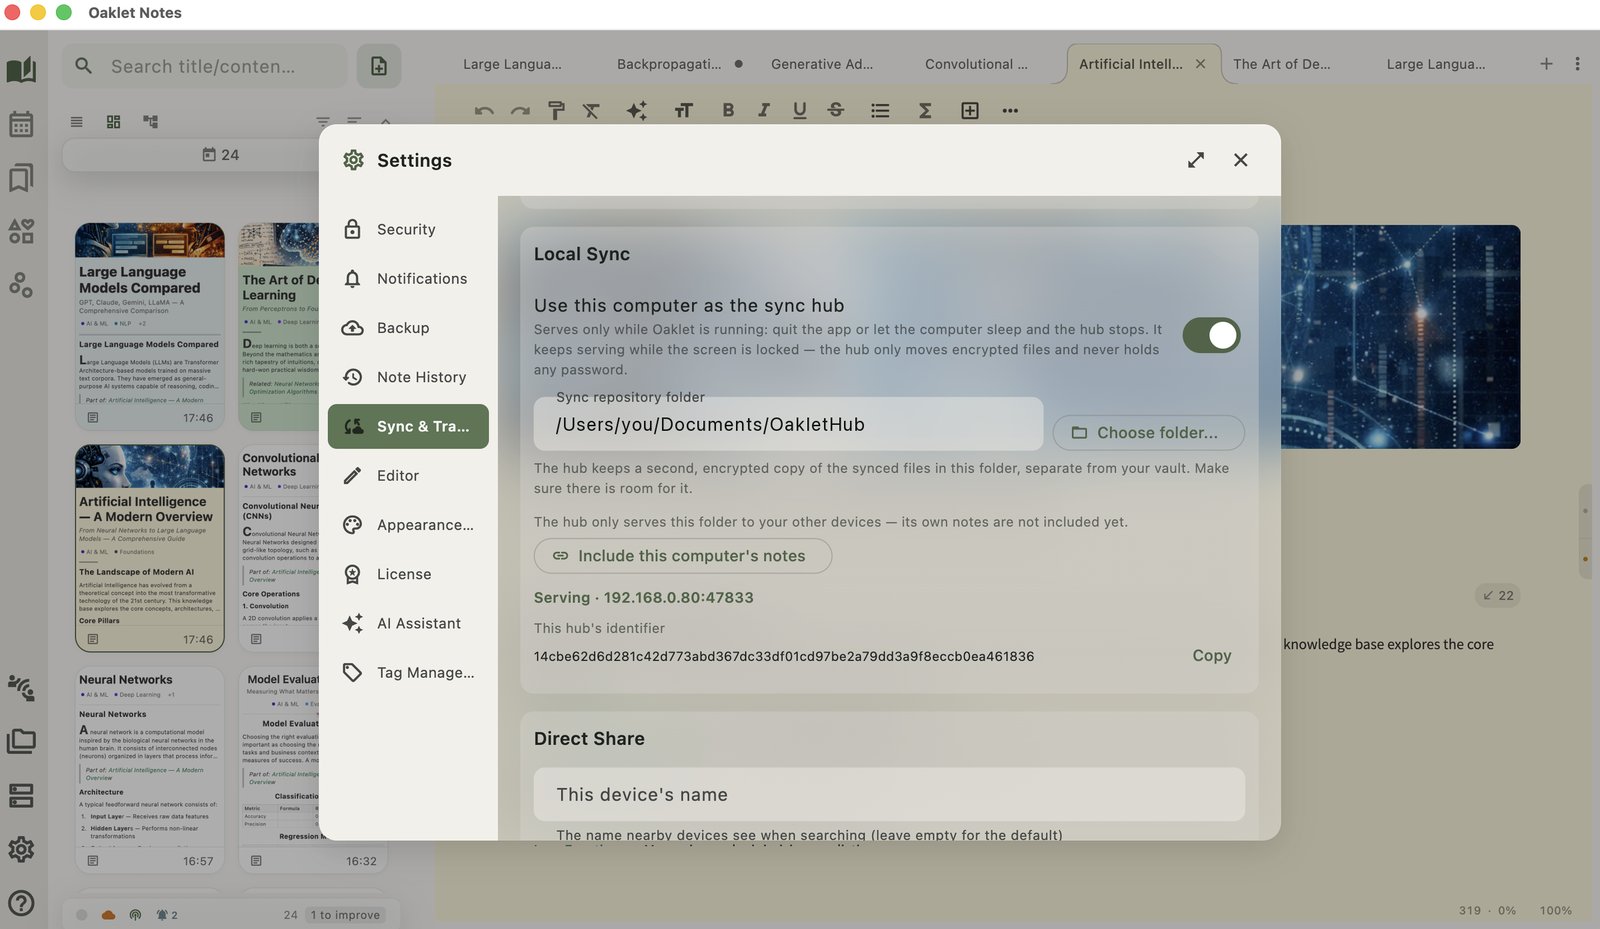
Turn on the hub. On the computer that will be the hub, go to Settings → Sync → Local Sync, turn on Use this computer as the sync hub, and pick a folder for the synced files. Choose a folder outside your vault, with room for a second, encrypted copy of your notes.
-
Allow it on your network. The first time, your system asks whether to allow this. On Windows, it's a firewall prompt: choose Allow access and check Private networks. On Mac, iPhone, and iPad, it asks about Local Network. If you decline, your other devices won't find the hub. Windows only asks once. If you declined, open Windows Security → Firewall & network protection → Allow an app through firewall, and check Private for Oaklet Notes.
-
Add the hub computer's own notes, if you want them synced. Turning on the hub doesn't include that computer's own notes yet. To share them with your other devices, choose Include this computer's notes. A computer has one main way to sync at a time, so if this one was syncing through your NAS, Local Sync takes over as its main sync. To keep a copy going to your NAS as well, add it under Also sync to in Settings → Sync.
-
Open the vault on your other devices. On the screen where you open or create a vault, choose From local sync hub…. On a new install, choose Open or sync a vault first, then Open a vault from a local sync hub…. Pick your hub from the computers found nearby, pick the vault, and enter its vault password.
The hub only works while that computer is awake and Oaklet is running. If you close the lid or quit the app, your other devices show Hub offline. That's not an error. What you write is still saved on each device, and it catches up once the hub is back.
What your NAS or hub can see
Your notes are encrypted with your vault password on your device, before they're sent anywhere. Oaklet uses AES-256-GCM, a widely used encryption standard, and your vault password never leaves your device. So your NAS, or the folder on your hub computer, holds only encrypted files. It can see how many there are, how big they are, and when they change, but not what's in them. Anyone who gets hold of those files, or of the NAS itself, still can't read your notes without your vault password. So choose a strong one.
If you forget your vault password, a recovery key is the only way back in. If you haven't set one up yet, do it in Settings and keep it somewhere safe.
Sync moves your notes only between your devices and your NAS or hub. Your notes also aren't locked in. Each of your devices keeps its own copy of the vault, and you can export any note to Markdown.
When you're away from home
If your NAS only works on your home network, Oaklet shows a gray Can't reach server while you're out. That's not an error. Everything you write is saved on your device, and it catches up on its own once you're back on a network that can reach your NAS. The same goes for Local Sync once you're back on the hub's Wi-Fi.
To sync through your NAS while you're out, your NAS has to be reachable from outside your home, for example through a VPN. Your NAS maker's documentation explains the options. If someone else set up your NAS, ask them to turn on remote access for you.
When two devices edit the same note
If you change different paragraphs of the same note on two devices, Oaklet merges them automatically on your device.
If both devices change the same paragraph, Oaklet keeps both versions. The note switches to the other device's version, and what you wrote is kept in full as a copy. If the note is open, a bar appears at the top of the editor. Tap View my version to get your version back. You can also find these copies anytime under Vault Center → Sync → View Conflicts.
Other options
- External Folder syncs through a folder that another tool keeps up to date, such as a cloud drive client or a USB drive. How quickly changes arrive depends on that tool. It's part of Pro too.
- To send notes from one device to another without setting up sync, Direct Share is free.
To get started, download Oaklet Notes, set up WebDAV or Local Sync with the steps above, and try Pro free for 30 days in the app. For every option and setting, see Sync in the Oaklet Notes User Guide.